
Below are the step-by-step instructions to install and customize Dryad Receipting in your Salesforce organization (org).
It is recommended to try the app in a sandbox first (the type of sandbox doesn’t matter). Once everything has been installed, configured, and works well, then deploy it to additional sandboxes or to production.
If you prefer to have the app professionally installed on your behalf, checkout our Installation Service.
Start Here
- Install Dryad Receipting for Salesforce from the AppExchange
- During the installation process,
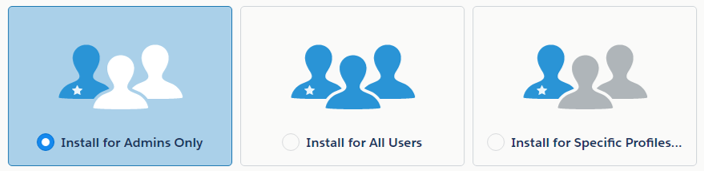
- Select “Install for Admins Only”
2. Approve the third-party accessDetails on are found in Third-Party Access and Data Residency
Once the app has been installed, continue with the steps below to configure the various features of the app.
Upload Images
To add images to your template, use files.
- Go to Files
- On the left, click “Libraries”
- Click “New Library”
- Enter a Name and Description (e.g. “Receipt Library”)
- Click on the new library name
- Click “Add Files” and select the image from your computer
- Click Save to upload the file
- Click on the title of the uploaded image
- On the image, right mouse click and select “Copy image address”
- Copy this link in the receipt settings or on the receipting account
Set Sender Email Address
To email receipts to donors directly from Salesforce, an Organizational Wide Email Address is required.
- Go to Settings > Email > Organizational-Wide Addresses
- If one doesn’t already exist, click “Add”
- Enter a Display Name, such as “{your organization name}”
- Enter an Email Address, such as “no-reply@{your organization name.com}”
- Set “Purpose” to “Default No-Reply Address”
- Click “Save”
- Copy the Email Addresses
- Go to the tab Receipt Settings > General Settings
- Paste the email address into the field “Org Wide Email Address”
To ensure maximum reliability in email delivery, setup DKIM and general email security mechanisms for the email address above. See Email Security Mechanisms for more information.
Receipt Settings
This will allow you to customize the settings related to receipting.
- Using the App Manager, go to the new app called “Dryad Receipting”
- Click on the tab “Receipt Settings”
- Using the left menu, click “Charity Information”
- Click “Edit” and enter a value for all fields for the primary charity
- For logo
- Primary Charity Address
- On the left menu, click “General Settings”
- For “Receipt Name Starting #”, set the starting number for your receipts .
- If you have never send receipts before, you can set this number to any value.
- If you have send receipts before, set this number to any value greater than your latest receipt number.
- For example, if your last issued receipt number was 10245, then set “Receipt Name Starting #” to any number greater than 10245 (say 10500). The first receipt issued in Dryad Receipting will start at this number (10500). All subsequent receipt numbers will increment this number by 1 (10501, 10502, etc.)
- For example, if your last issued receipt number was 10245, then set “Receipt Name Starting #” to any number greater than 10245 (say 10500). The first receipt issued in Dryad Receipting will start at this number (10500). All subsequent receipt numbers will increment this number by 1 (10501, 10502, etc.)
- For “Org Wide Email Address”, set the email address specified in the section Organizational Wide Email Address
- For “Minimum Receipt Amount”, set the minimum amount for a donation to be eligible for a tax receipt. Usually this is $20.
- For “Email Template Id”, set the Salesforce Id for the email template specified in the section Email Template
- For “Receipt Template Id”, set the Salesforce Id for the receipt template specified in the section Receipt Template. The default value refers to the default receipt template.
- You can ignore the left menu “Advanced Settings” for now
Receipt Template
The receipt template determines the page layout of the .pdf document for receipts. A default template was created during the installation process, but you’ll want to customize it based on your organization’s branding. Basic knowledge of HTML is necessary for this step.
- Go to the tab “Receipt Templates” and change the list view from “Recently Viewed” to “All”
- Select the default template, called “RT-00001”
- Confirm “Filename”, which is the starting name of the .pdf. The actual receipt # and issue date will be appended to this name.
- E.g. If Filename = “Receipt”, the latest receipt # is “10001” and the issue date is “2023-02-01”, then the final .pdf name will be “Receipt 100001 2023-02-01.pdf”
- Edit “Content”, as needed
- This can get quite technical, so I’ll keep this brief. Hopefully someone at your organization understands HTML. In the near future, a library of templates will be made available to you.
- A few considerations while editing this field:
- It should always start with
<html>
<head>
<link rel=”stylesheet” href=”/resource/receiptCSS”>
</head>
<body> - It should always end with
</body>
</html> - ReceiptCSS refers to a static resource of the same name, which contains your styling (e.g. font size, class styles, etc.) See details below.
- Merge fields are specified as {!dryad__Receipt__c.dryad__Payment_Date__c}
- Some merge fields should always be present and are dynamic
- Merge fields must be from the Receipt object only. Thus if you need to access a field from another object, create a formula field on the Receipt object first and then use the formula field in Content.
- It should always start with
To find the Salesforce Id of the receipt template
- TBD
Stylesheet Settings
A style sheet (.css) allows you to further customize the receipt template by setting fonts, class styles, colours, etc.
- Go to Settings > Custom Code > Static Resources
- Click “receiptCSS”
- Click “View file”
- Copy the code into a text editor
- Make the necessary changes on your local computer
- Return to receiptCSS
- Click “Edit”
- Click “Choose File” and select the file from your local computer
- Make sure Cache Control is set to “Public”
- Click “Save”
Email Settings
Lightning Email Template
When emailing receipts from Salesforce, the .pdf of the tax receipt is sent using a Lightning Email Template. A default email template was created during installation, but further customization is needed based on your organization’s branding.
- Go to Email Templates
- Select the folder “Receipt Email Templates”
- For “Receipt Email Template”, click “Clone”
- Set the Email Template Name
- Select the folder “Receipt Email Templates”
- Edit the fields “Subject” and “HTML Value”, as needed
To find the Salesforce Id of the email template
- TBD
Page Layouts
Add the receipt-related fields and buttons to the some page layouts.
Contact
Add Fields
- Go to Settings > Object Manager > Contact > Page Layouts
- Select the applicable page layout (e.g. Contact Layout)
- There may be more than one page layout that needs to be updated
- In the top console, select “Fields”
- Drag-and-drop “Section” into the page layout to create a new section and label it “Receipt Information”
- Drag-and-drop the following fields into the new “Receipt Information” section
- Receipt Delivery
- Receipt Occurrence
- Save the changes
Add Related List
- Go to Settings > Object Manager > Contact > Page Layouts
- Select the applicable page layout (e.g. Contact Layout)
- In the top console, select “Related Lists”
- Drag-and-drop “Receipts” to the related lists section of the page layout
- On the Receipts related list, click the wrench icon and add the following fields
- Receipted Amount
- Issue Date
- Status
- Set “Sort By” to Receipt Issue Date and select “Descending”
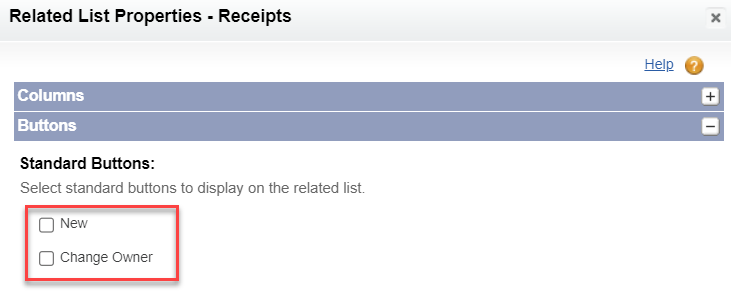
- Click on the section below called “Buttons”
- Uncheck “New” and “Change Owner” to prevent receipts from being created this way
- Click the button “Save”
Account
Add Fields
- Go to Settings > Object Manager > Account > Page Layouts
- Select the applicable page layout (e.g. Organization Layout)
- Do not add it to the Household Layout
- There may be more than one page layout that needs to be updated
- In the top console, select “Fields”
- Drag-and-drop “Section” into the page layout to create a new section and label it “Receipt Information”
- Drag-and-drop the following fields into the new “Receipt Information” section
- Receipt Delivery
- Receipt Occurrence
- Save the changes
Add Buttons (Pro Edition only)
- Go to Settings > Object Manager > Opportunity > Page Layouts
- Select the applicable page layout (e.g. Donation Layout)
- If you haven’t already, in the “Salesforce Mobile and Lightning Experience Actions” section of the page layout, click “override the predefined actions”
- In the top console, select “Mobile & Lightning Actions”
- Drag-and-drop the button “Set Receipt Details” to the “Salesforce Mobile and Lightning Experience Actions” section of the page layout
- Save the changes
Opportunity
Add Fields
- Go to Settings > Object Manager > Opportunity > Page Layouts
- Select the applicable page layout (e.g. Donation Layout).
- There may be more than one page layout that needs to be updated.
- In the top console, select “Fields”
- Drag-and-drop “Section” into the page layout to create a new section and label it “Receipt Information”
- Drag-and-drop the following fields into the new “Receipt Information” section
- Receipt Status
- Receipt Amount
- Last Receipt (set as Read-Only)
- Last Receipt Issue Date
- Do Not Receipts
- Do Not Receipts Comments
- Drag-and-drop another section into the page layout and call it “Advantage Information”
- Drag-and-drop the following fields into the “Advantage Information” section
- Advantage
- Advantage Amount
- Advantage Description (EN)
- Advantage Description (FR)
- Save the changes
- Additionally, for the opportunity page layout called “In-Kind Gift”, drag-and-drop the following fields next to the “Fair Market Value” field
- Appraiser Name
- Appraiser Address
Add Buttons
- Go to Settings > Object Manager > Opportunity > Page Layouts
- Select the applicable page layout (e.g. Donation Layout)
- If you haven’t already, in the “Salesforce Mobile and Lightning Experience Actions” section of the page layout, click “override the predefined actions”
- In the top console, select “Mobile & Lightning Actions”
- Drag-and-drop the button “New Receipt” to the “Salesforce Mobile and Lightning Experience Actions” section of the page layout
- Save the changes
Add Related List
- Go to Settings > Object Manager > Opportunity > Page Layouts
- Select the applicable page layout (e.g. Donation Layout)
- In the top console, select “Related Lists”
- Drag-and-drop “Receipt Installments” to the related lists section of the page layout
- On the Receipt Installments related list, click the wrench icon and add the following fields
- Receipt
- Receipt Issue Date
- Receipt Status
- Set “Sort By” to Receipt Issue Date and select “Descending”
- Click on the section below called “Buttons”
- Uncheck “New” and “Change Owner” to prevent receipts from being created this way
- Click the button “Save”
Recurring Donation
Add Fields
- Go to Settings > Object Manager > Recurring Donation > Page Layouts
- Select the applicable page layout (e.g. Enhanced Recurring Donation Layout)
- In the top console, select “Fields”
- Drag-and-drop “Section” into the page layout to create a new section and call it “Receipt Information”
- Drag-and-drop the following fields into the new “Receipt Information” section
- Receipt Status
- Last Receipt
- Last Receipt Issue Date (set as Read-Only)
- Do Not Receipts
- Do Not Receipts Comments
If you are using Enhanced Recurring Donations, perform the following additional steps:
- Go to Settings > Object Manager > Recurring Donation > Field Sets
- Click “Recurring Donations Entry Form Custom Fields”
- Drag-and-drop the following fields into the fieldset section
- Do Not Receipts
- Do Not Receipts Comments
Add Buttons
- Go to Settings > Object Manager > Recurring Donation > Page Layouts
- Select the applicable page layout (e.g. Recurring Donation Layout)
- If you haven’t already, in the “Salesforce Mobile and Lightning Experience Actions” section of the page layout, click “Override the predefined actions”
- In the top console, select “Mobile & Lightning Actions”
- Drag-and-drop the button “New Receipt” to the “Salesforce Mobile and Lightning Experience Actions” section of the page layout
Add Related List
- Go to Settings > Object Manager > Recurring Donation > Page Layouts
- Select the applicable page layout (e.g. Recurring Donation Layout)
- In the top console, select “Related Lists”
- Drag-and-drop “Receipt Installments” to the related lists section of the page layout
- On the Receipt Installments related list, click the wrench icon and add the following fields
- Receipt
- Receipt Issue Date
- Receipt Status
- Set “Sort By” to Receipt Issue Date and select “Descending”
- Click on the section below called “Buttons”
- Uncheck “New” and “Change Owner” to prevent receipts from being created this way
- Click the button “Save”
Permission Sets
Three permission sets are used to provide access to receipting fields and functionality.
- Receipt User: users that need to generate tax receipts
- Receipt Editor: users that only need to manage receipt templates
- Receipt Admin: an administrators that needs to manage settings and templates. It includes all permissions from Receipt User and Receipt Editor.
See this article to learn more about permission sets.
Additional permission should never be given to any users allowing them to delete receipts or receipt installations, as a full history is needed for compliance purposes.
To add a permission set to a user
- Go to Settings > Users >Users
- Click on the user to receive permissions
- In the section “Permission Set Assignments” click “Edit Assignments”
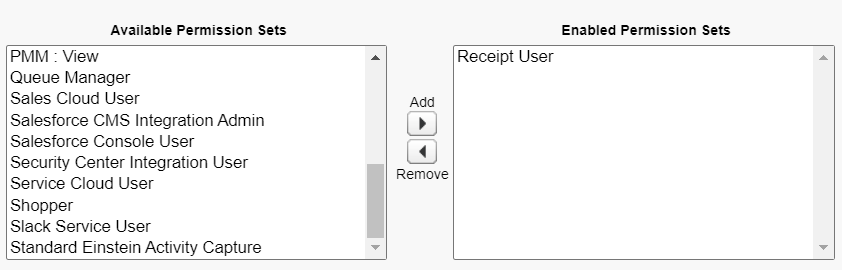
- Under “Available Permission Sets”, click “Receipt User” or “Receipt Editor” or “Receipt Admin” and then “Add”
Additional Settings
- Go to Settings > Process Automation > Workflow Rules
- Enable the following workflows, if not already enabled.
- Contact.EmailChanged_Alternate
- Contact.EmailChanged_Personal
- Contact.EmailChanged_Work
- Contact.Preferred_Email__c
- Email only: Paste to Work
- Opportunity Copy FMV to Amount
Additional Support
If you need more hands-on help to install Dryad Receipting, please contact me for further assistance.